Godot 3 Dialogue System - documentation
A downloadable project
- About.
- Getting started.
- How the demo works.
- Creating / importing new dialogues.
- Transfering to another project.
- Customizing.
- Parser Structure.
- File Structure.
- Exporting.
- License.
_____________________________________________________
1. About
A highly customizable dialogue system perfect for story-driven RPGs and Visual Novels.
Includes GDscript parser, full dialogue system, examples of use, and two types of message visualisations.
For Godot 3.1 +.
2. Getting started
Import the project into Godot 3.1 (or higher) and run it.
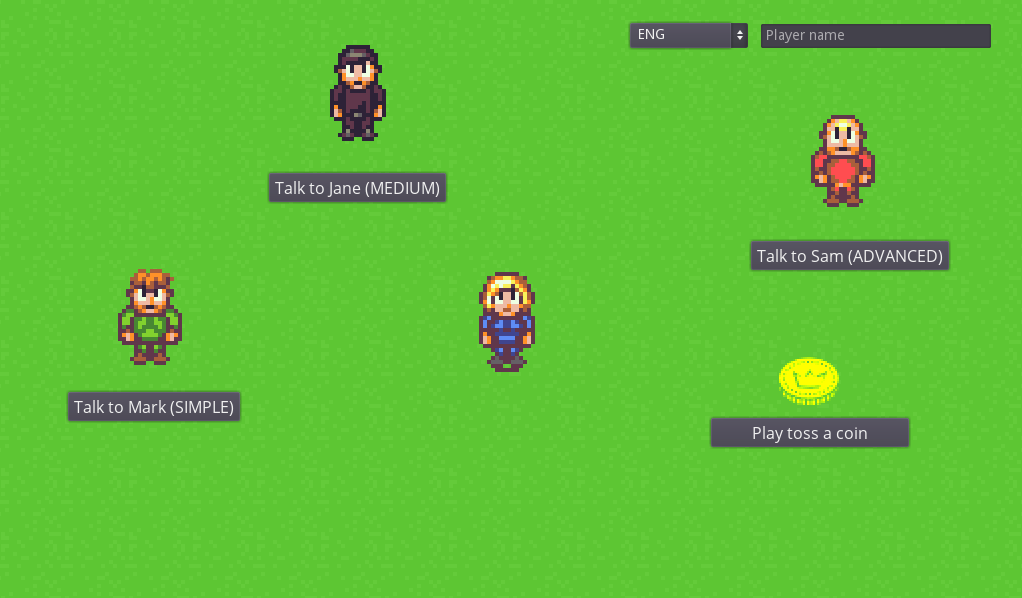
Now you can click the buttons in order to see 3 example dialogues and one simple game of coin toss. In the upper right corner there is also a drop-down menu that lets you choose the language of the dialogues as well as a place to write players's name (that name will appear in one of the dialogues).
Click each of the buttons and see what happens!
Important! You can skip / continue dialogues by pressing SPACE. You can change this button in Project>Project Settings>Input Map.
3. How the demo works
In the demo, the buttons are connected to each character by a function that calls a character based on the variable talk_to. Each character has a function called talk() which starts a dialogue assigned to them (interaction_script). In a game, you obviously wouldn't want to use buttons but run a dialogue when interacted with player instead.
Each character has a few optional values:
- face - graphic that will show up in the dialogue box
- color - value that can be used to color either the name of the character or their text
- voice_pitch - how high or how low the sound effect is.
You can easily add more values and integrate the in your dialogue system (all you need to do is get current_speaker and then the value).
The player also has values that get accessed in the dialogue (money and mood) - they can be used in conditionals or displayed as text.
4. Creating / importing new dialogues
You should consider getting the dialogue editor designed specifically for this system: DialogueDesigner. Otherwise you can write the files by hand but it's rather cumbersome.
The dialouges must be in JSON format: https://medium.com/omarelgabrys-blog/json-in-a-nutshell-7d638dfea7cc
Text formatting (only MSG Box):
- bold - [b] text[/b]
- italics - [i] text [/i]
- underlined - [u] text [/u]
- color - [color=red] text [/color] or
- color - [color=6aaeff] text [/color]
- Getting a game variable: @variable_name
- Example: Hi! My name is @G.player_name .
- Getting a local variable: @MSG.var("variable_name")
- Example: We've talked @MSG.var("times_talked") times.
- Pausing text (only MSG Box): |
- Example: Let me think... | Oh, I know!
Notes:
- The G in @G.player_name is the autoloaded script containing the variable player_name. You can change it to your own script's name or a script path.
- After using a getter (f.e. @G.player_name) always add an additional space. This is needed because the function searches for the end of the function's name by trying to find space at the end. The text will look normal in the game.
5. Transfering to another project
In order to transfer the system to your own project, you must do the following:
1. Copy the MSG_System folder to your project's addons folder.
2. Set up autoloads (Project>Project Settings>AutoLoad) like this:

3. Go to Project>Project Settings>Input Map and add a new input: dialogue_next. This is the button that lets you continue the dialogue.
4. Open MSG_Parser.gd and find onready var camera = level_root().get_node("Camera2D") (line 012), change the value to a path pointing to your main camera (this is for moving the camera to a new dialogue speaker, you can turn that off by commenting out lines of code calling slide_camera_to and return_camera functions).
5. (when using MessageBubble) Change overall_scale to match your game's zoom level (the bubble might show up out of camera's view if the value is too low or too high):

Important! This system is not an actual Godot addon. You don't need to enable it in the addons tab. I chose to place it in the addons folder for easy access. All the files needed for it to work are contained within this folder, so you don't need to copy the whole demo when creating your own project.
More on autoloads: https://docs.godotengine.org/en/3.1/getting_started/step_by_step/singletons_auto...
6. Customizing
You can easily customize both dialogue boxes and dialogue bubbles (visuals and behavior). You can customise these files:
- MSG_Box.tscn - classic box message
- MSG_Bubble.tscn - floating message
- MSG_Options.tscn - decisions for players to choose
- choice_button.tscn - a decision button
- MSG_Parser.tscn - the main script (parser) - see [7.]
Some of customisable nodes:
- NinePatchRect - change this to your own image to change the look of the box / bubble. MORE: https://docs.godotengine.org/en/3.1/classes/class_ninepatchrect.html#description
- label - shows text on the screen. Here, you can change how the text will look, it's font, colors and more.
- SFX - the sound effect played while the dialogue text is showing
- characters_timer - how fast the characters show up
- SFX_Timer - how many times the sound is being played
7. Parser Structure
The script runs like this:
1. start_dialogue(json_path, interacted_object=null) - called from outside the script
json_path - path to the dialogue file
interacted_object - object with which the player interacted to start the dialogue (null by default) (used when the character value in show message node is set to interacted character)
2. _auto_next() - automatically goes to the next step
3. next() - function containg all the node types
Everytime the function is called it does a match for the type value of the dialogue node and it calls code specific to each node.
4. update_text(text, any_choices)
text - next dialogue lines to be shown
any_choices - (boolean) does the player have any decisions to make?
5. end() - the end of the dialogue (next is null)
Please make a post under this text if you have any questions about the parser and you think I should explain something else as well, and I will update this section.
8. File structure
The files needed for the system are in JSON format. More: https://en.wikipedia.org/wiki/JSON
Example file: https://jsonblob.com/bb42fdcc-f807-11e9-b936-f52daeb23252
There are 4 main categories in the file:
- nodes - nodes used when constructing the dialogue
- languages - languages available
- variables - stores characters defined in Variables Database
- characters - stores characters defined in Characters Database
Data stored in those categories are used for games (you use them when writing your dialogue system).
(There are also categories used only DialogueDesigner editor. You don't need to care about them, they are just there so the editor can import them properly: editor_version, file_name, connections (connections between nodes), selected_language).
In code:

* variable types: 0 - string ; 1 - integer ; 2 - boolean.
NODES:
Your dialogue will always start from the start node;

The most important keys (categories) for you are next and node_type.
next - shows the ID (node_name) of the next node. If next is null then that means that the dialogue has ended.
node_type - the type of node; this is useful because each node has its own set of keys and values that need to be read in a different way.
Branches:
Sometimes you need more next values, for example when you want to introduce a little bit of non-linearity or give the player choices.
That's where branches and choices keys come in:
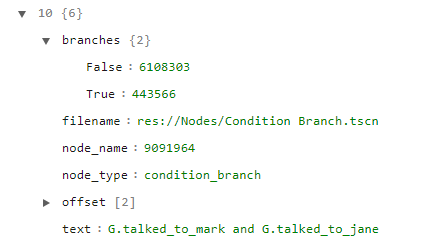
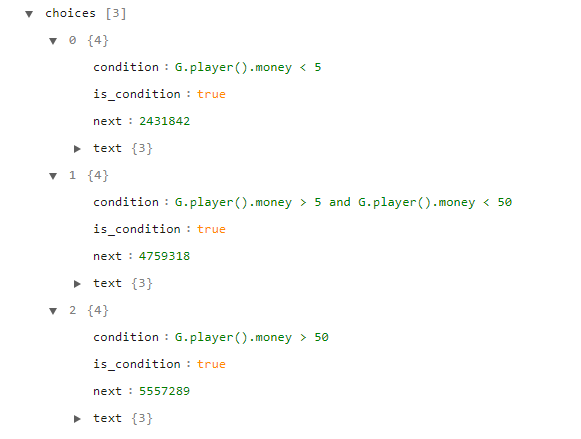
They work in the same way as standard next values but need to be checked with an if statement or a switch to get the next value the dialogue will use. Always use only one next value!
Show Dialogue node:
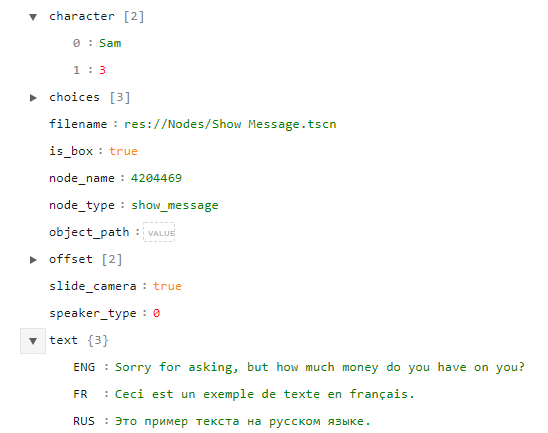
- Character - character which says the dialogue lines:
- 0 : [character's name]
- 1 : [character's number (EDITOR ONLY)]
- Speaker type: 0 - character / 1 - custom path / 2 - Interacted character; this is used simply to check which value will be retrieved when selecting the speaker.
_____________________________________________________
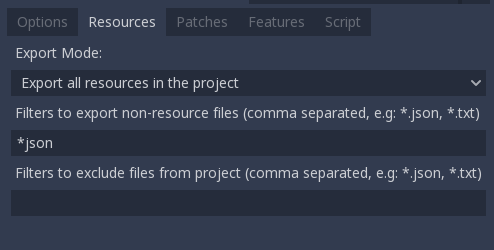
9. Exporting
IMPORTANT! When exporting your project, remember to go to resources tab and add a *json exception for non-exportable files (Godot by default doesn't export text based files with your games, and since all dialogues are stored in JSONs, you need those exported as well). Set it exactly like this:
More on exporting: https://docs.godotengine.org/en/3.1/getting_started/step_by_step/exporting.html
10. License:
You can:
- Make and sell software that use these files and code...
- ...without crediting me.
- Modify the files in any way you see fit.
You can't:
- Release the code fully or partially on the internet.
- Make videos or screenshots of the code and publish it online.
- Make software using this system open-source (when open-sourcing, make sure not to include this system in the files)
Please, respect my right to make some money from my work :) Thank you!
Characters:
https://opengameart.org/content/db16-rpg-character-sprites-v2
Coin icon:
game-icons.net
_____________________________________________________
That's it!
Developed by radmatt.
Got any questions? Should something else be explained? Don't hesitate to make a post on the discussion board.